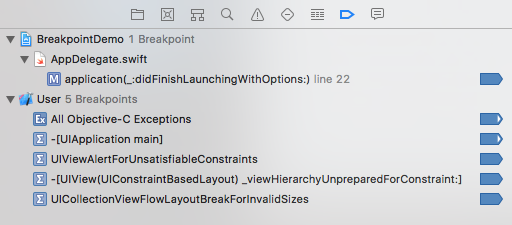
As most iOS developers are aware, breakpoints are an essential tool to debugging apps. In Xcode, setting a breakpoint is as easy as clicking on the line number that you want to pause app execution on. When execution is paused, you can view the state of any variables in scope, issue commands to the debugger, and even step through your code line-by-line to watch the execution flow unfold before your eyes.

To make your debugging experience with breakpoints even better, we’ll cover the 5 breakpoints that every iOS developer should enable. If you’re a seasoned iOS developer, you may already know about some of these. If you’re new to iOS development, don’t worry, we’ll start with a quick overview of how to setup and use breakpoints.
The Breakpoint Navigator
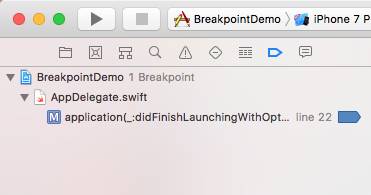
Managing breakpoints in Xcode is super simple. Enter the Breakpoint Navigator, which lives in the Navigator Panel on the left side of Xcode. Here, you will see all the breakpoints currently set in your project. Click on the name of the method to jump right to that line of code or click on the blue breakpoint icon to enable/disable the breakpoint. Removing a breakpoint is as easy as dragging it outside of the panel.
Symbolic Breakpoints
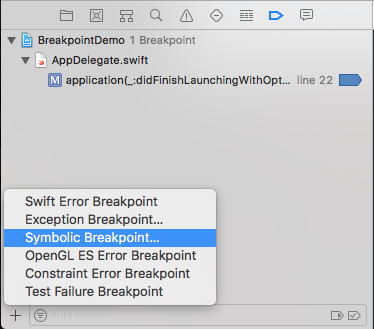
While it’s very useful to set breakpoints on specific lines of code, it can also be helpful to have some breakpoints function globally. Symbolic breakpoints are breakpoints that will trigger on certain conditions, like any time a certain method is called on a class. Adding a symbolic breakpoint is achieved by clicking the "+" icon at the lower left of the Breakpoint Navigator and selecting “Symbolic Breakpoint”.
The Top 5 Xcode Breakpoints
Here we are, the secret sauce! Use the "+" button at the bottom left of the Breakpoint Navigator to add the following breakpoints:
All Objective-C Exceptions
This breakpoint catches exceptions thrown by Objective-C code. Due to the current transition to Swift, this breakpoint isn’t as useful as it once was, but it can still be handy if your app contains any Objective-C code or uses third-party libraries that are written in Objective-C.
Turn it on:
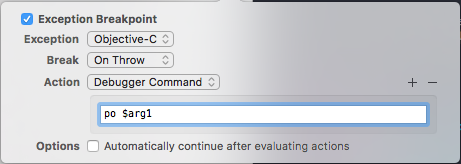
- Add an "Exception Breakpoint"
- Change the "Exception" value from "All" to "Objective-C"
- Click "Add Action" to add a "Debugger Command" action
- Type in "po $arg1" for the command. This will automatically print the relevant error to the console when you encounter an exception
-[UIApplication main]
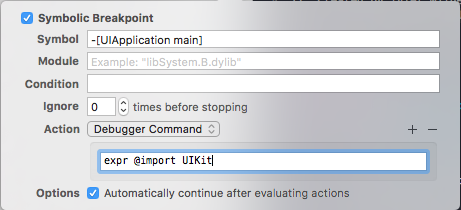
This puts a breakpoint at the entry point to your application’s launch. We’ll be using the "Debugger Command" action again to have our debugger import UIKit, which will make the debugger much more aware of properties and methods on things like UIView. This will make it easier to interact with and print properties on these types of classes when you’re debugging.
Turn it on:
- Add a "Symbolic Breakpoint"
- Type in "-[UIApplication main]" for the Symbol
- Add a "Debugger Command" action
- Enter "expr @import UIKit" for the command
- Check "Automatically continue after evaluating actions" — this will ensure that your app doesn’t immediately pause execution every time you build and run
UIViewAlertForUnsatisfiableConstraints
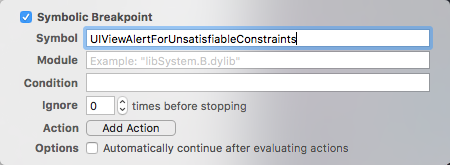
This breakpoint helps you catch undesirable constraint configurations. If you’ve ever seen the “unable to simultaneously satisfy constraints” error message in the console, it will suggest you set a breakpoint here. Usually, these situations don’t cause obvious visual errors, but they should be fixed since we don’t know how they will be handled in future versions of iOS.
Turn it on:
- Add a "Symbolic Breakpoint"
- Type in "UIViewAlertForUnsatisfiableConstraints" for the Symbol
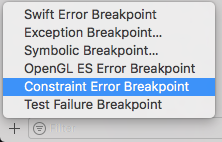
NOTE: In Xcode 9, there is a new "Constraint Error" breakpoint that can be used instead of manually creating this symbolic breakpoint.
-[UIView(UIConstraintBasedLayout) _viewHierarchyUnpreparedForConstraint:]
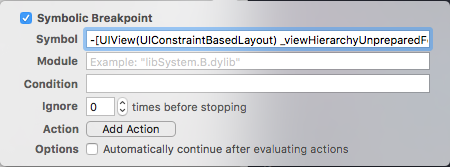
This is another breakpoint to help you identify Auto Layout constraint problems. Hitting this breakpoint is typically much less common than hitting the "UIViewAlertForUnsatisfiableConstraints" breakpoint above, but it’s still good to go ahead and make sure you turn this one on.
Turn it on:
- Add a "Symbolic Breakpoint"
- Enter "-[UIView(UIConstraintBasedLayout) _viewHierarchyUnpreparedForConstraint:]" for the Symbol
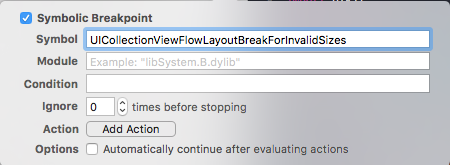
UICollectionViewFlowLayoutBreakForInvalidSizes
This last breakpoint helps catch layout errors in UICollectionView’s flow layout. This is especially useful if you ever work with self-sizing collection view cells or create your own flow layout subclass.
Turn it on:
- Add a "Symbolic Breakpoint"
- Enter "UICollectionViewFlowLayoutBreakForInvalidSizes" for the Symbol
One More Thing - User Breakpoints
As you can imagine, it can be quite tedious and time consuming to create all five of these breakpoints for every project you work on. This is where the power of promoting your project breakpoints to "User Breakpoints" comes into play. User Breakpoints will automatically be present in any Xcode project you open! To convert a breakpoint to a user breakpoint, right-click on the breakpoint and choose "Move Breakpoint To" -> "User."
When everything is said and done, you should now have five breakpoints listed under "User" in the Breakpoint Navigator. These breakpoints will be set up for any Xcode project you open from here on out. Also, notice that any project-specific breakpoints will be listed above these "User" breakpoints, under your project’s name.
